Coding Meetups Progressive Web Apps Slides Tools Vue.js
Scaffolding a Progressive Web App using Vue CLI 3
· 15 Minutes / 3,756 Words
Vue CLI 3 has been released and it’s completely different from its previous version. Discover how it simplifies your toolchain, reduces configuration fatigue and improves your developer experience.
This guide is intended for beginners who’ve never used Vue as well as veterans who’ve already used Vue CLI 2 and wish to quickly start building projects with Vue CLI 3.
Table of Contents
- Vue? Vue CLI?
- Install Vue CLI 3
- Create a new project
- Add the official Progressive Web App plugin
- Test the Progressive Web App plugin
- Configure the Progressive Web App plugin
- Configure webpack
- Troubleshoot relative file imports
- Prerender pages for SEO
- Audit with WebPagetest and Lighthouse
- Conclusion
- Links/Resources
- Footnotes
Vue? Vue CLI?
Vue (/vjuː/) is a progressive framework for building user interfaces.
You may have already heard that, if you’ve stumbled upon this guide. The word “progressive” means, that there’s a very quick learning curve. You can start to use just a little of what the framework offers and gradually use and learn more and more concepts. But what is the Vue CLI?
The first and second versions of the Vue CLI have essentially been a tool for scaffolding Vue projects. After the Vue CLI had prepared a project you wouldn’t need or use the Vue CLI anymore. Vue CLI 3 is different, because it is designed to be a companion for Vue developers. It’s a full system for rapid Vue development that you’ll be using constantly while developing your application.
Vue CLI is a
tool for scaffolding Vue projectsfull system for rapid development.
Vue CLI 3 is also more in line with Vue’s goal of being a progressive framework. Whereas Vue CLI 2 scaffolded a large project with 500-1000 lines of configuration code in multiple files for you1, Vue CLI 3 hides away this complexity and let’s you start with a very simple setup, allowing you to fully customize its parts and go deeper as soon as, and only if, you need it.
Install Vue CLI 3
The first thing, obviously, is to install Vue CLI 3. As is the case with most command-line tools, the Vue team recommends to globally install Vue CLI 3. However, before you do that, be sure to remove Vue CLI 2, to avoid any conflicts caused by remaining files.
For both removing Vue CLI 2 and installing Vue CLI 3 you can use the package manager you prefer (npm or Yarn) and run the following commands:
npm uninstall vue-cli -g
npm install -g @vue/cli
yarn global remove vue-cli
yarn global add @vue/cliTake note that the Vue CLI 3 package is @vue/cli, not vue-cli. Every npm package that has to do with Vue CLI 3 is prefixed with @vue and can be found in the vue scope/namescape.
Create a new project
You now have a global vue tool which you can use to do various things. Run vue --help to get a list of all commands. The first command we’ll be using is vue create. You call it with the name of the application you want to create:
vue create my-projectThe Vue CLI then presents you with a few prompts. These kinds of prompts will show up often when working with the Vue CLI.
It asks you to pick a preset or manually select your application’s features. For this example we’ll manually select features, to start with a simple and minimal application. Select only Babel and Linter (ESLint + Airbnb) and place all config in package.json:

The CLI will then download and resolve all necessary dependencies, install CLI plugins and inform you about the progress. When it’s done you can open the created folder and run npm run serve, which will fire up a hot-reloading development server at http://localhost:8080/.
cd my-project
npm run serve
What’s in a project?
Let’s now inspect the generated folder. You’ll find 4 directories with 10 files:
my-project
├── README.md
├── babel.config.js
├── package-lock.json
├── package.json
├── public
│   ├── favicon.ico
│   └── index.html
└── src
    ├── App.vue
    ├── assets
    │   └── logo.png
    ├── components
    │   └── HelloWorld.vue
    └── main.js
If you are familiar with Vue CLI 2 you’ll notice that these are fewer files, containing even fewer lines of code1. The projects generated by Vue CLI 3 are easier to understand and demand less time and effort to get an overview of.
The same is true for the project’s package.json file. Whereas a project created with Vue CLI 2 had dozens of dependencies listed, our application only has a few dependencies2:
{
  "dependencies": {
    "vue": "^2.5.21"
  },
  "devDependencies": {
    "@vue/cli-plugin-babel": "^3.2.0",
    "@vue/cli-plugin-eslint": "^3.2.0",
    "@vue/cli-service": "^3.2.0",
    "@vue/eslint-config-airbnb": "^4.0.0",
    "babel-eslint": "^10.0.1",
    "eslint": "^5.8.0",
    "eslint-plugin-vue": "^5.0.0",
    "vue-template-compiler": "^2.5.21"
  }
}
We’ll get into the details of the @vue packages in the next sections. Before that let’s head to the scripts field.
Understanding vue-cli-service
{
  "scripts": {
    "serve": "vue-cli-service serve",
    "build": "vue-cli-service build",
    "lint": "vue-cli-service lint"
  }
}
When you’ve run npm run serve you might have noticed that npm runs the vue-cli-service serve command. The vue-cli-service is a binary that was installed when creating the project. It provides serve, build and lint commands, which take over tasks that have previously (in Vue CLI 2) been set up in each project individually.
The vue-cli-service is what allows the Vue CLI 3 to scaffold projects without hundreds of lines of webpack configuration. It strips away a lot of configuration while also allowing you to benefit from updates to the vue-cli-service, without having to adjust your project’s configuration. In Vue CLI 2 template updates and security fixes would go by your project unnoticed, if you did not invest the time to manually apply updates and resolve conflicts.
Add the official Progressive Web App plugin
We’ve already talked about the @vue/cli-service package listed in your project’s devDependencies. The other @vue packages, @vue/cli-plugin-babel and @vue/cli-plugin-eslint, are plugins for Vue CLI 3.
{
  "devDependencies": {
    "@vue/cli-plugin-babel": "^3.2.0",
    "@vue/cli-plugin-eslint": "^3.2.0",
    "@vue/cli-service": "^3.2.0",
    "@vue/eslint-config-airbnb": "^4.0.0",
    // …
  }
}
Understanding Vue CLI’s plugins
Vue CLI 3 is centered around plugins that can enhance the development experience or functionality of your application. They can be individually added, removed and updated, in most cases without you having to change your application or configuration.
Most plugins also have a sensible default configuration, meaning you don’t even have to configure a plugin, as long as you don’t want to change its default behaviour. This goes so far as to many plugins not even placing their default configuration in your package.json or their separate configuration files. But we’ll get to that when we configure the official Progressive Web App plugin.
@vue/cli-plugin-babel
The already installed @vue/cli-plugin-babel transforms your ES2015+ code according to the configuration in babel.config.js. By default it uses a @vue/app preset, making sure your application works on all browsers supported by the Vue framework itself3, and the browserlist field in your package.json. This field is also used for PostCSS – you can read the Browser Compatibility section in the Vue CLI 3 documentation for further details.
@vue/cli-plugin-eslint
@vue/cli-plugin-eslint checks your code against the eslintConfig configuration in your package.json files. It does this whenever you make changes to your code, when running the development server via npm run dev.
Adding the Progressive Web App plugin
Now, if we want to add further plugins we can use the vue add command, followed by either the full name of the plugin, or a shorthand version. The following two commands lead to the same result:
vue add @vue/pwa
vue add @vue/cli-plugin-pwa
This will install the @vue/cli-plugin-pwa package, which adds a lot of Progressive Web App functionality to your project. After completion it will tell you that it has changed/created the following files:
├── package-lock.json
├── package.json
├── public
│   ├── img
│   │   └── icons
│   │       ├── android-chrome-192x192.png
│   │       ├── android-chrome-512x512.png
│   │       ├── ...
│   ├── manifest.json
│   └── robots.txt
└── src
   ├── main.js
   └── registerServiceWorker.js
- The plugin adds itself and the
register-service-workerpackage as dependencies to yourpackage.jsonfile. - It created a few files in the
publicfolder, all of which you can edit to match your application’s design: amanifest.json,robot.txtand a set of icons for various devices. - It also adds a a few lines that initialize a Service Worker (in
main.jsandregisterServiceWorker.js), via Google’s Workbox libray.
We’ll talk about how to configure the Service Worker after the next section. If you’re unsure what a Service Worker is or what it’s used for in a Progressive Web App – keep in mind that we’re only using it for caching network requests, so that your app (or at least parts of your app) are available offline or in unreliable network conditions.
Test the Progressive Web App plugin
The Service Worker is disabled in development mode, because local changes may not show up while you develop your application when files are being cached. This means if you want to test your Progressive Web App you’ll have to build your Vue application first, which can be done by simply running npm run build.
Build (and serve) your application
You will most likely encounter linting errors when trying to run npm run build. To fix them just run npm run lint --fix and it will automatically fix main.js and registerServiceWorker.js to match your ESLint settings4.
Now that you’ve build you application open the dist folder that was created and serve your application. You can do this with npx http-server or any other HTTP server that can serve files from a folder.
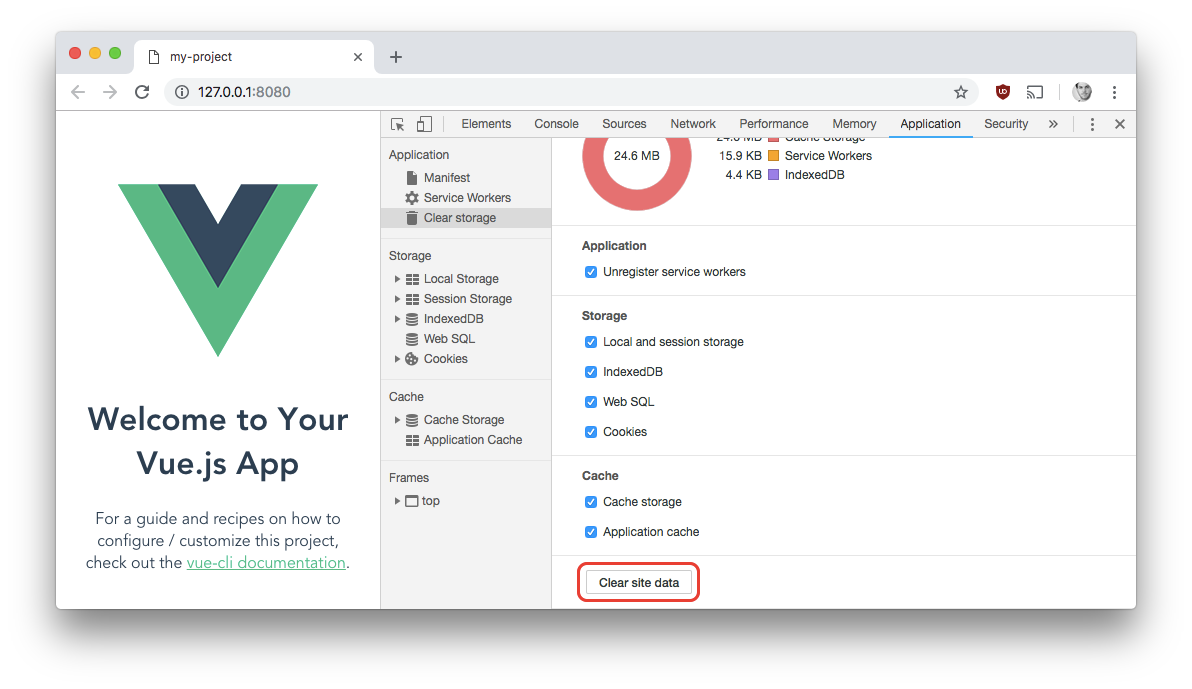
Clear site data
It’s also a good idea to clear Service Workers and Cache Storage for http://localhost:8080/, if you have previously served another (Vue) project at this URL. If you don’t want to do this you can also just use the browser’s incognito mode.

Inspect cache and test offline functionality
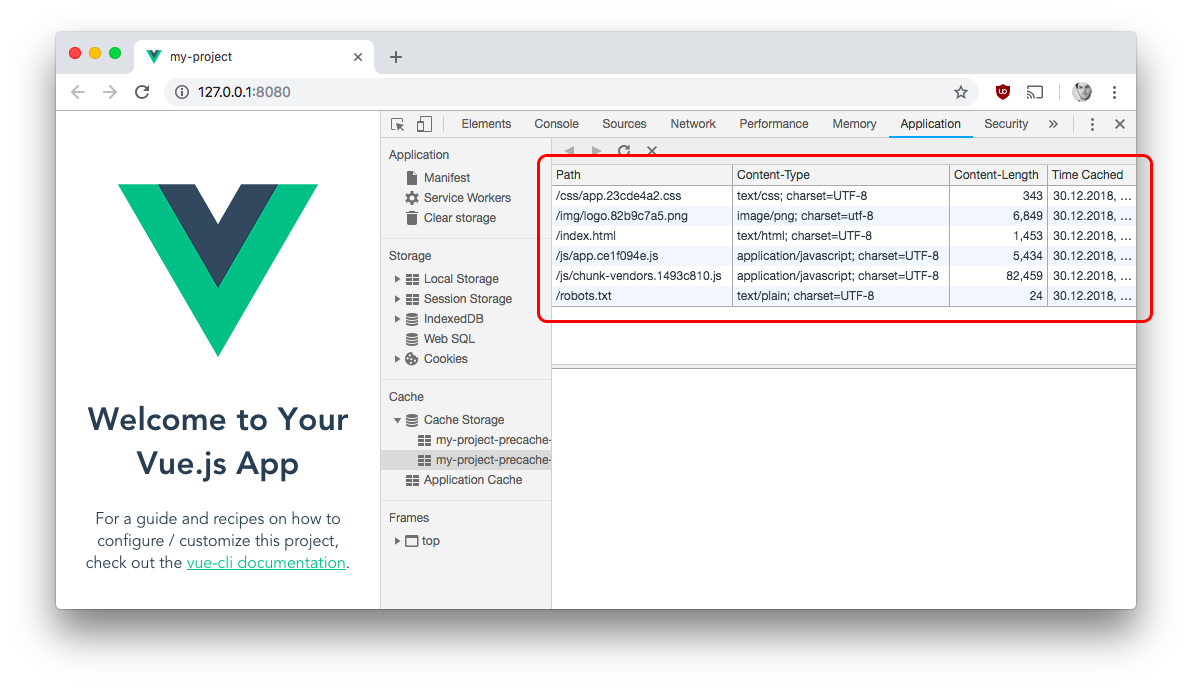
When you visit your application in the browser the Service Worker automatically caches all HTML, CSS, JavaScript and image files. You can inspect the cache storage in your browser’s development tools:

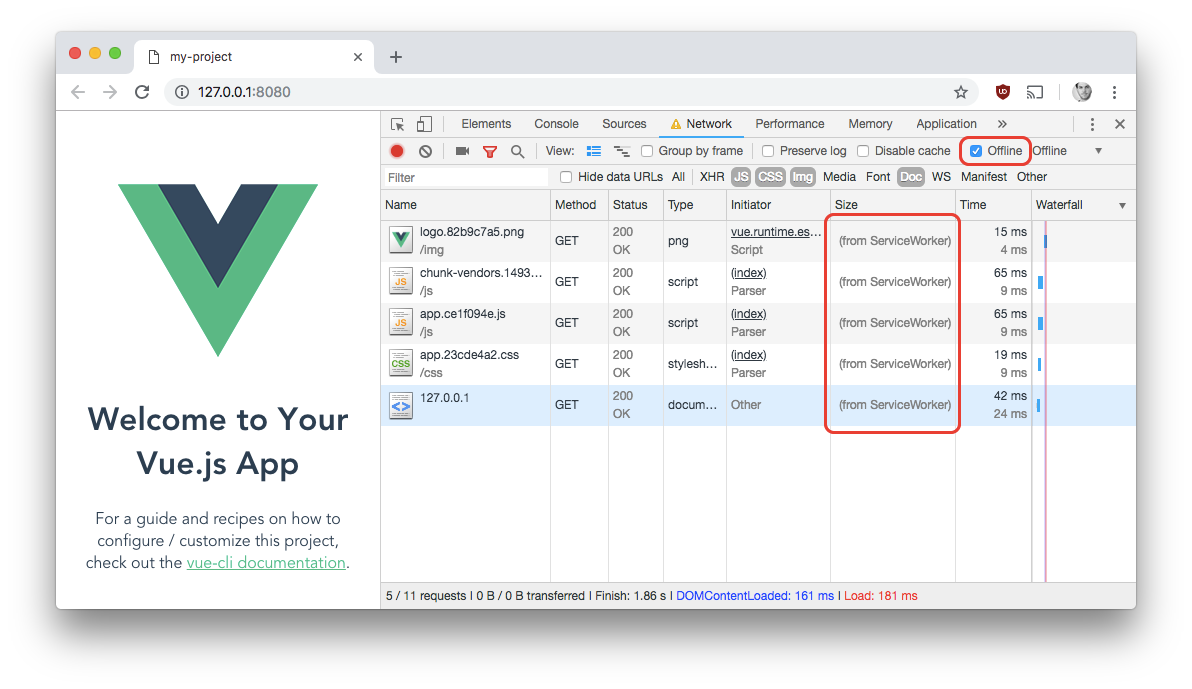
Next, you should test if the Service Worker correctly proxies network requests when you’re offline, and returns the cached results. You can unplug your Ethernet cable, disconnect from your Wi-Fi, or use the network filter in your browser’s development tools. If you do so you should still be able to visit your site, as (almost) all assets are provided by the Service Worker.

Configure the Progressive Web App plugin
You have already seen where libraries (Babel, PostCSS, ESLint …) can be configured when using Vue CLI 3: in dedicated config files or in package.json fields. For many plugins, especially official Vue CLI plugins in the @vue namespace, there’s another place for configuration: vue.config.js.
The vue.config.js does not exist when you initially create a project with Vue CLI 3. You have to create it youself if you want to change the default configuration of your Vue CLI plugins. It has to export a single configuration object via module.exports = {}.
Here’s an example configuration for my Japanese Phrasebook, a Progressive Web App built with Vue CLI 3:
module.exports = {
  // … other Vue CLI plugin options …
  pwa: {
    name: 'Japanese Phrasebook',
    themeColor: '#f44336',
    msTileColor: '#f44336',
    iconPaths: {
      favicon32: 'img/icons/favicon-32x32.png',
      favicon16: 'img/icons/favicon-16x16.png',
      appleTouchIcon: 'img/icons/apple-touch-icon-180x180.png',
      maskIcon: 'img/icons/safari-pinned-tab.svg',
      msTileImage: 'img/icons/msapplication-icon-144x144.png',
    },
    workboxOptions: {
      cacheId: 'phrasebook',
      importWorkboxFrom: 'local',
      navigateFallback: 'shell.html',
      navigateFallbackWhitelist: [/^((?!\/404).)*$/],
      // … other Workbox options …
    },
  },
};
The workboxOptions configure the Service Worker. In my case the cache’s name is phrasebook and all Workbox files are loaded from my server, instead of Google’s CDNs. The application also has an App Shell, so that the red header is always cached and shown until the application itself is ready and fully loaded.
All other options change how your application is presented when installed on different systems. The plugin automatically adds all necessary HTML elements to your index.html.
<link rel="icon" type="image/png" sizes="32x32" href="/img/icons/favicon-32x32.png">
<link rel="icon" type="image/png" sizes="16x16" href="/img/icons/favicon-16x16.png">
<link rel="manifest" href="/manifest.json">
<meta name="theme-color" content="#f44336">
<meta name="apple-mobile-web-app-capable" content="no">
<meta name="apple-mobile-web-app-status-bar-style" content="default">
<meta name="apple-mobile-web-app-title" content="Japanese Phrasebook">
<link rel="apple-touch-icon" href="/img/icons/apple-touch-icon-180x180.png">
<link rel="mask-icon" href="/img/icons/safari-pinned-tab.svg" color="#f44336">
<meta name="msapplication-TileImage" content="/img/icons/msapplication-icon-144x144.png">
<meta name="msapplication-TileColor" content="#f44336">
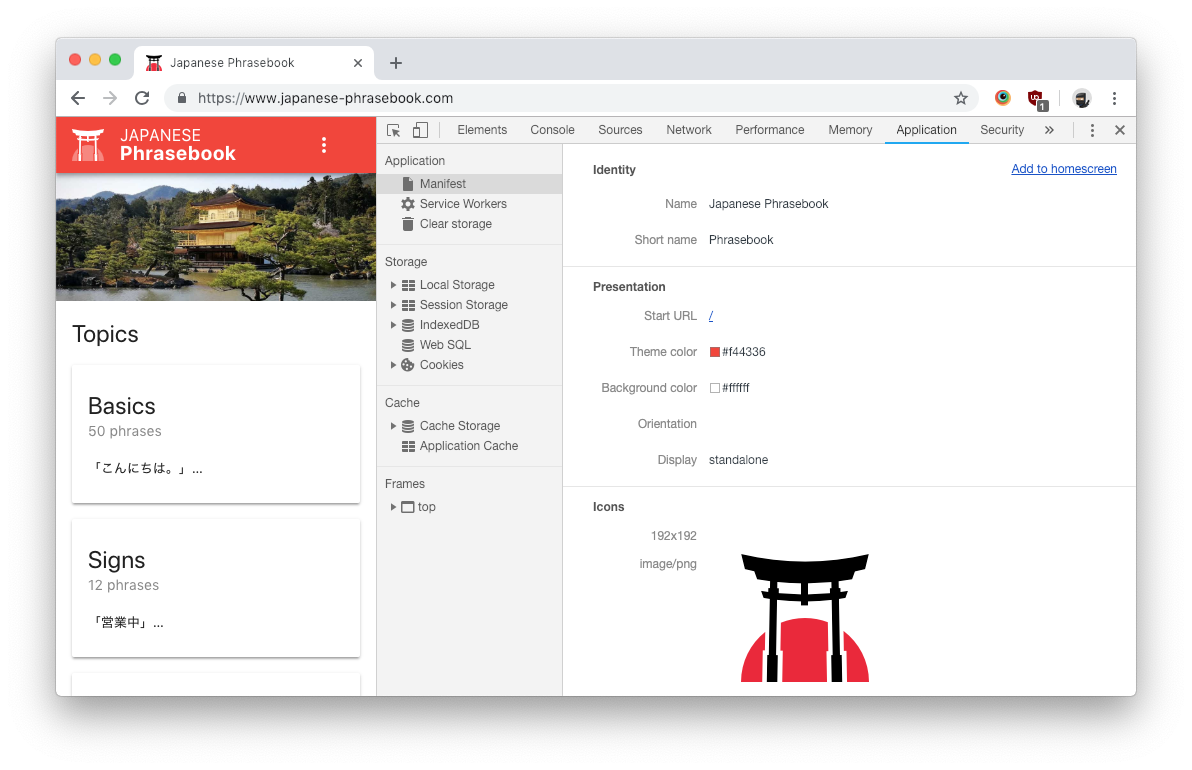
You have to edit your app’s manifest.json yourself, unfortunately. It should match the settings you choose for the Progressive Web App plugin. You can debug the manifest in your browser’s developer tools:

All configuration options are listed in @vue/cli-plugin-pwa’s README.md. You don’t have to change any of the default options, if you don’t want to, but I suggest that you set the name, themeColor and msTileColor correctly.
Configure webpack
At some point in your project’s life you’ll want to edit the webpack configuration, maybe to add another webpack plugin or edit an existing webpack loader (we’ll be doing both these tasks in the following sections). Vue CLI 3 allows you to edit the webpack configuration inside your vue.config.js file in three different ways.
Option 1: Provide an object to the configureWebpack property
If you simply pass an object to the configureWebpack property it will be merged with the existing webpack config. This way you can easily add new plugins and loaders.
// vue.config.js
module.exports = {
 configureWebpack: {
   plugins: [
     new MyPlugin()
   ],
 }
};
Option 2: Provide a function to the configureWebpack property
If you want to have more control you can assign a function to the configureWebpack property. It receives a config argument which you can mutate directly. This allows you to have different configurations for development and production builds.
module.exports = {
 configureWebpack: config => {
   if (process.env.NODE_ENV === 'production') {
     // You can mutate the config directly …
   }
   // … or return an object which will be merged.
 }
};
Option 3: Use the (advanced) chaining API
If you want full control, edit existing plugins and loaders or simply prefer method chaining you can pass a function to the chainWebpack property (instead of configureWebpack). This allows you to make configuration changes using the chaining API provided by webpack-chain. With it you can easily tap into an existing plugin or loader and modify its settings.
module.exports = {
 chainWebpack: config => {
   config
     .plugin('html')
     .tap(args => {
       return [/* … */]
     })
 }
};
We’ll be using the chaining API for a simple example in the next section.
Troubleshoot relative file imports
The Vue CLI 3 documentation on Static Assets Handling mentions that static assets are inlined when they are referenced using a relative path and smaller than 4KB:
Internally, we use
file-loaderto determine the final file location with version hashes and correct public base paths, and useurl-loaderto conditionally inline assets that are smaller than 4kb, reducing the amount of HTTP requests.
However, when you reference an SVG file it won’t get inlined. The file only gets a version hash for cache busting when building your application:
<img src="./assets/logo.svg" alt="Logo">
<!-- becomes -->
<img src="./assets/logo.ec9a16c8.svg" alt="Logo">
Inspecting your webpack configuration
To “debug” the webpack configuration and learn why the SVG doesn’t get inlined Vue CLI 3 provides an inspect command. If you run the command without any arguments it will output the complete webpack configuration the CLI uses when building your application.
To narrow your search down use the --rules or --plugins options. When you know the exact name of your rule you can also just output a single webpack rule:
vue inspect --rule images{
test: /\.(png|jpe?g|gif|webp)(\?.*)?$/,
use: [
{
loader: 'url-loader',
options: {
limit: 4096,
fallback: {
loader: 'file-loader',
options: {
name: 'img/[name].[hash:8].[ext]'
}
}
}
}
]
}These lines tell us that images are loaded with the url-loader when they are smaller than the 4096 bytes limit. If they are larger the file-loader is used as a fallback.
But what’s that? The test regular expression only lists PNGs, JPGs, GIFs and WebPs as images. What about SVGs? SVGs have their own default rule:
vue inspect --rule svg{
test: /\.(svg)(\?.*)?$/,
use: [{
loader: 'file-loader',
options: { name: 'img/[name].[hash:8].[ext]' }
}]
}Use the chaining API to edit the images rule
I personally want SVGs to be handled exactly as any other image type. To accomplish this you can edit the webpack configuration in vue.config.js.
We’ll use the chaining API to delete the svg rule and adapt the test regular expression of the images rule:
module.exports = {
  chainWebpack: (config) => {
    config.module.rules.delete('svg');
    config.module.rule('images')
      .test(/\.(svg|png|jpe?g|gif|webp)(\?.*)?$/);
  }
};
With these changes the logo.svg gets inlined (using the data URI scheme) as long as it’s smaller than 4096 bytes:
<img src="./assets/logo.svg" alt="Logo">
<!-- becomes (after modifying default config) -->
<img src="data:image/svg+xml;base64,..." alt="Logo">
Prerender pages for SEO
Your Progressive Web App is already up and running. This section explains an optional step you can take for search engine optimization (SEO): Configuring the Prerender SPA Plugin for webpack to prerender pages – actually a list of routes – of your application. This gives search bots the ability to crawl your public-facing pages without having to execute JavaScript.
First run npm install prerender-spa-plugin --save-dev, then edit your vue.config.js:
const path = require('path');
const PrerenderSPAPlugin = require('prerender-spa-plugin');

module.exports = {
  // … other Vue CLI options …
  configureWebpack: (config) => {
    if (process.env.NODE_ENV !== 'production') {
      return {};
    }
    return {
      plugins: [
        new PrerenderSPAPlugin({
          staticDir: config.output.path,
          routes: ['/', '/about', /* … */],
          renderer: new PrerenderSPAPlugin.PuppeteerRenderer({
            renderAfterDocumentEvent: 'rendered',
          }),
            // … other Prerender SPA Plugin options …
        }),
      ],
    };
  }
};
The plugin listens for a rendered custom event to take its snapshot, so you have to emit it when your app has finished rendering. You can do so from your root Vue instance, for example:
new Vue({
  /* … */
  mounted() {
    document.dispatchEvent(new Event('rendered'));
  },
});
You might also want to add the data-server-rendered custom attribute to your application’s public/index.html file. This helps Vue to correctly take over the static content sent by the server and replace it with dynamic content, a process called “client side hydration”:
<body>
  <div id="app" data-server-rendered="true"></div>
</body>
When you run a production build the plugin will now add index.html, about/index.html – and any other route you have configured – to your dist directory.
Please have a look at the Prerender SPA Plugin documentation for all its options. You can find a more advanced example in the vue.config.js file of the full example application in the links/resources section.
Audit with WebPagetest and Lighthouse
If you’ve followed this guide you should be able to achieve an optimal Lighthouse score with the help of Vue CLI 3, as well as straight A’s in WebPagetest:

Did I say straight A’s? The above results are actually for my Japanese Phrasebook. It uses Google Analytics, which does not send caching headers, so Google’s scripts are always up to date, resulting in a D for caching static content:
Leverage browser caching of static assets: 60/100

FAILED - (15.0 minutes) - https://www.googletagmanager.com/gtag/js?id=UA-122315460-1
FAILED - (45.7 minutes) - https://www.google-analytics.com/analytics.js
Conclusion
We’ve walked you through using the Vue CLI 3 for scaffolding a Progressive Web App, explaining the CLI’s core concepts along the way, which should give you a great starting point for further Vue development.
We did talk about
- using the Vue CLI 3 to create a project,
- adding and configuring Vue CLI plugins,
- configuring the official Progressive Web App plugin,
- configuring webpack,
- prerendering pages for SEO
- and building your application.
We did not tap into
- the Vue CLI 3 UI,
- presets (for bypassing the prompts when creating a project),
- instant prototyping,
- build targets (including the
--modernflag and web components) - and plugin development,
all of which I may highlight in further articles, if you’re interested.
If you want to see a complete Progressive Web App build with Vue CLI 3 have a look at my Japanese Phrasebook, the full example application in the links/resources section. I have kept the Vue CLI 2 and Vue CLI 3 snapshots in separate branches, if you’re interested in the exact differences when upgrading/migrating to Vue CLI 3.
I want this guide to be as helpful as possible, especially for beginners. If you have questions, suggestions or any feedback please leave them in the comments or contact me on Twitter.
Links/Resources
Official plugins
- @vue/cli-plugin-babel
- @vue/cli-plugin-typescript
- @vue/cli-plugin-eslint
- @vue/cli-plugin-pwa
- @vue/cli-plugin-unit-jest
- @vue/cli-plugin-unit-mocha
- @vue/cli-plugin-e2e-cypress
- @vue/cli-plugin-e2e-nightwatch
Full example application
Footnotes
- This is compared to running
vue init webpack my-projectand using thewebpacktemplate. - The amount of dependencies of course depends on what you’ve selected in the
vue createprompts. - Vue supports all browsers that support ES5 (IE8 and below are not supported).
- Vue CLI 3 plugins can generate JavaScript files, but they can’t and often won’t match your ESLint settings, depending on the plugin author’s preferences.
If you liked this article, please consider sharing it with your followers.