Digital Art Coding Games Functional Programming Lazy Loading RxJS three.js WebGL
Game Graphics with WebGL/three.js and Lazy-Loading of 3D Models
· 10 Minutes / 2,415 Words
This is the third part in a series on creating a game with RxJS 5, Immutable.js and three.js. We’ll look at rendering 3D graphics with WebGL by using the three.js library. The goal of this part is to have a scene that’s updated according to the Immutable.js collection returned by our game state stream.
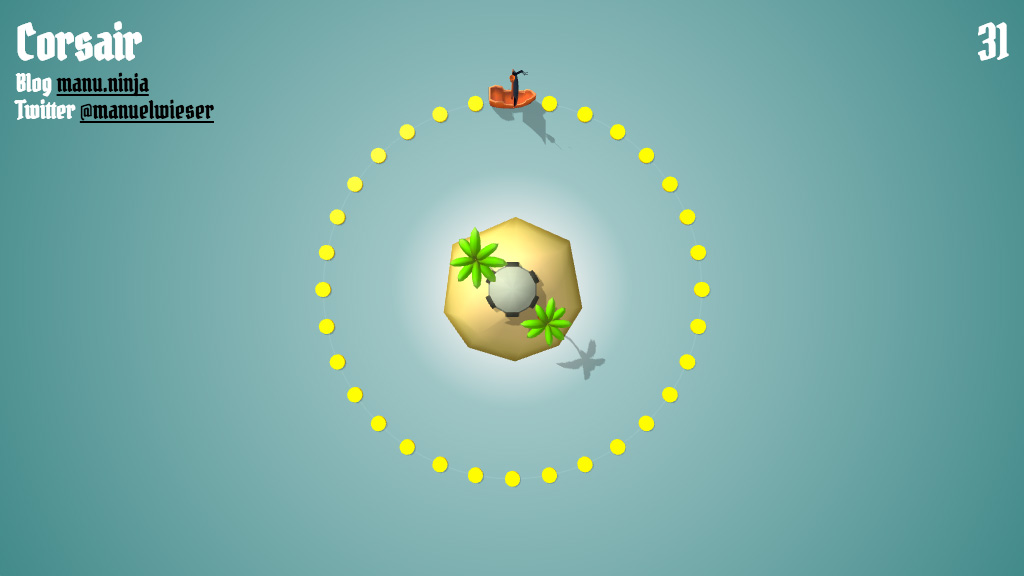
The full Corsair game, which we’re developing in this series, is available on GitHub. You can clone it, play it and read the full source code while reading this article, if you want. All parts of the series are listed in Functional Reactive Game Programming – RxJS 5, Immutable.js and three.js.
Scene setup
A scene holds your camera(s), lights and models. You create a scene by calling new THREE.Scene() and then add objects with the add() method. We’ll look at different types of objects later, but for now the most important object is the camera.
There are different camera types in three.js. We’ll be using a PerspectiveCamera, as it gives us a 3D perspective projection. The various parameters define the camera’s viewing frustrum. Please refer to the three.js documentation and Helpers section for help on defining the frustrum.
To render the scene you have to create a WebGLRenderer. The renderer has a domElement property, which is a canvas element where the renderer draws its WebGL graphics. You can add it anywhere to your page, but we’ll add it to the body and stretch it to the whole browser viewport.
function setup() {
    const scene = new THREE.Scene();
    const camera = new THREE.PerspectiveCamera(75, window.innerWidth / window.innerHeight, 1, 200);
    camera.position.z = 100;

    const renderer = new THREE.WebGLRenderer({ alpha: true, antialias: true });
    renderer.setPixelRatio(window.devicePixelRatio);
    renderer.setSize(window.innerWidth, window.innerHeight);
    renderer.shadowMap.enabled = true;
    document.body.appendChild(renderer.domElement);

    // We'll discuss lighting later...

    const circle = circleFactory();
    scene.add(circle);

    const ship = shipFactory();
    const water = waterFactory();
    const island = islandFactory();
    const coins = new THREE.Object3D();
    const cannonballs = new THREE.Object3D();

    scene.add(ship);
    scene.add(water);
    scene.add(island);
    scene.add(coins);
    scene.add(cannonballs);

    window.addEventListener('resize', () => {
        camera.aspect = window.innerWidth / window.innerHeight;
        camera.updateProjectionMatrix();
        renderer.setSize(window.innerWidth, window.innerHeight);
    }, false);

    return (state) => {
        // Update all scene objects by reading the Immutable.js state...
        renderer.render(scene, camera);
        $score.innerHTML = state.get('score');
    };
}
Please note that the setup function returns a function that’s receiving the game state, which we’ve defined in the Game State with RxJS 5/Immutable.js part of this series. First the function updates all scene objects by reading the Immutable.js state. Then it renders the scene and updates the score display, which is just an HTML element on top of the WebGL canvas.
We’ll take a thorough look at updating the scene objects in the Updating scene objects and animation section.
Lighting
three.js offers a few different types of lights. The ones we’ll be using are an ambient light, a hemisphere light and a directional light. The ambient light is the simplest and brightens the whole scene, without any shading. It does not have a direction nor can it cast any shadows.
const ambientLight = new THREE.AmbientLight(0xffffff, 0.35);
ambientLight.color.setHSL(0.1, 1, 0.95);
scene.add(ambientLight);
The hemisphere light has two colors, one for the sky and one for the ground. The sky color is used for the highest point of the hemisphere, directly on top of the scene. It then fades gradually to the ground color. We can use the hemisphere light to simulate outdoor conditions, but like the ambient light, it can not cast any shadows.
const hemisphereLight = new THREE.HemisphereLight(0xffffff, 0xffffff, 0.5);
hemisphereLight.color.setHSL(0.6, 1, 0.95);
hemisphereLight.groundColor.setHSL(0.095, 1, 0.75);
hemisphereLight.position.set(0, 0, 500);
scene.add(hemisphereLight);
This is where the third light, the directional light, comes in. It is the scene’s sun and casts a shadow.
const directionalLight = new THREE.DirectionalLight(0xffffff, 0.65);
directionalLight.color.setHSL(0.1, 1, 0.95);
directionalLight.position.set(-1, 1, 1);
directionalLight.position.multiplyScalar(50);
directionalLight.castShadow = true;
scene.add(directionalLight);
We have to tweak a few settings for a clean shadow that’s operating in the right spot. Please refer to the three.js documentation and Helpers section for help.
directionalLight.shadow.mapSize.width = 1024;
directionalLight.shadow.mapSize.height = 1024;
directionalLight.shadow.camera.left = -50;
directionalLight.shadow.camera.right = 50;
directionalLight.shadow.camera.top = 50;
directionalLight.shadow.camera.bottom = -50;
directionalLight.shadow.camera.near = 1;
directionalLight.shadow.camera.far = 200;
Adding objects via primitive geometries
The scene is set up and ready for being populated with 3D objects. Many of them can be created using primitive geometries like boxes, circles, cylinders, planes and spheres.
three.js has a built-in CircleGeometry, but we only want a circle line for the ship’s course, not a circle surface. To achieve this we can use the LineBasicMaterial and build the geometry ourselves, by pushing vertices into an empty Geometry. The geometry and material are then combined to form a THREE.Line object.
function circleFactory() {
    const segmentCount = 64;
    const radius = RADIUS;
    const geometry = new THREE.Geometry();
    const material = new THREE.LineBasicMaterial({ color: 0xFFFFFF, opacity: 0.1, transparent: true });

    for (let i = 0; i <= segmentCount; i++) {
        const theta = (i / segmentCount) * Math.PI * 2;
        geometry.vertices.push(
            new THREE.Vector3(Math.cos(theta) * radius, Math.sin(theta) * radius, 0),
        );
    }

    return new THREE.Line(geometry, material);
}
The water mesh is just a simple plane. The material is what makes it interesting: A ShadowMaterial is transparent but can receive shadows. This way the page’s CSS gradient is visible behind the WebGL scene. For this to work we had to create the renderer with the { alpha: true } setting in the Scene setup section.
function waterFactory() {
    const geometry = new THREE.PlaneBufferGeometry(500, 500);
    const material = new THREE.ShadowMaterial({ opacity: 0.25 });
    const plane = new THREE.Mesh(geometry, material);
    plane.receiveShadow = true;
    return plane;
}
The coins are scaled CylinderGeometry objects. The MeshPhongMaterial has shininess and specular settings, ideal for glossy surfaces like metal.
function coinFactory() {
    const cylinder = new THREE.Mesh(
        new THREE.CylinderGeometry(2, 2, 0.5, 16),
        new THREE.MeshPhongMaterial({
            color: 0xffd800,
            shininess: 32,
            specular: 0xffff82,
        }),
    );
    cylinder.rotation.x = Math.PI / 2;
    cylinder.castShadow = true;
    return cylinder;
}
The cannonballs are just plain spheres with a shiny material.
function cannonballFactory() {
    const sphere = new THREE.Mesh(
        new THREE.SphereGeometry(2, 32, 32),
        new THREE.MeshPhongMaterial({
            color: 0x23232d,
            shininess: 64,
            specular: 0x646478,
        }),
    );
    sphere.castShadow = true;
    return sphere;
}
Adding objects via lazy-loading of 3D models
The ship and island are 3D models I’ve created in a 3D modeling software and exported as OBJ/MTL files. They can be loaded with the OBJLoader and MTLLoader that are hidden in the examples folder of the official three.js repository. There’s also a Collada loader, if you need animation support. I’ll stick with OBJ/MTL for my static objects, as I don’t need animations and virtually every software can read and write OBJ/MTL files.
The MTLLoader and OBJLoader both take a file path and a callback function. Putting these callbacks in a promise gives us an easy to use loadAsset() function. It takes the name of the asset as an argument and resolves to the fully loaded three.js object.
function loadAsset(name) {
    return new Promise((resolve, reject) => {
        const mtlLoader = new THREE.MTLLoader();
        mtlLoader.setPath('assets/');
        mtlLoader.load(`${name}.mtl`, (materials) => {
            materials.preload();
            const objLoader = new THREE.OBJLoader();
            objLoader.setMaterials(materials);
            objLoader.setPath('assets/');
            objLoader.load(`${name}.obj`, object => resolve(object), undefined, xhr => reject(xhr));
        }, undefined, xhr => reject(xhr));
    });
}
The ship factory calls loadAsset('ship') and then adds it to an empty Object3D. This way we can return the container immediately and start the game before the asset is fully loaded. Using this lazy-loading of 3D models you could also render a placeholder object, like a sphere or a model with less level of detail than the original. Almost all modern 3D games use such LOD rendering techniques.
As the ship consists of multiple shapes we have to traverse them and explicitly set each node to cast shadows. Also the ship’s sail is a surface shape, not a volumetric shape, so we want the materials to be rendered double-sided.
function shipFactory() {
    const container = new THREE.Object3D();
    //container.add(wireframeSphereFactory(6));
    loadAsset('ship').then((ship) => {
        ship.traverse((node) => {
            node.castShadow = true;
            if (node.material) {
                node.material.side = THREE.DoubleSide;
            }
        });
        ship.scale.multiplyScalar(12);
        ship.rotation.set(Math.PI / 2, Math.PI, 0);
        container.add(ship);
    });
    return container;
}
The island is loaded in the same way as the ship, using the loadAsset() lazy-loading function.
function islandFactory() {
    const container = new THREE.Object3D();
    loadAsset('island').then((island) => {
        island.scale.multiplyScalar(32);
        island.rotation.set(Math.PI / 2, 0, 0);
        island.position.set(0, 0, -8.5);
        island.traverse((node) => {
            node.castShadow = true;
        });
        container.add(island);
    });
    return container;
}
Updating scene objects and animation
The scene is now populated with 3D objects, so we want to give life to them. Let’s revisit the update function returned by our setup function. It receives the Immutable.js collection representing our game state.
return (state) => {
    // Update all scene objects by reading the Immutable.js state...
    renderer.render(scene, camera);
    $score.innerHTML = state.get('score');
};
The first thing we’ll do is create any objects we’ve not already created. This means creating a mesh for each coin in our game, if the empty Object3D coin container has no children.
if (!coins.children.length) {
    state.get('coins').forEach((coin) => {
        const mesh = coinFactory();
        const position = polarToCartesian(coin.get('angle'), coin.get('radius'));
        mesh.position.x = position.x;
        mesh.position.y = position.y;
        coins.add(mesh);
    });
}
We can then toggle the coins’ visibility according to the game state. This is far cheaper than creating and removing 3D objects, preventing any frame rate drops.
for (let i = 0; i < state.get('coins').size; i++) {
    coins.children[i].visible = !state.getIn(['coins', i, 'collected']);
}
We don’t know how many cannonballs we’ll need in the run of the game, so we create a bunch of them, just to be on the safe side. If these aren’t enough we add more when needed. This could later be tweaked for higher difficulty levels, when the cannon is operating faster.
if (!cannonballs.children.length) {
    for (let i = 0; i < 25; i++) {
        cannonballs.add(cannonballFactory());
    }
}
for (let i = 0; i < cannonballs.children.length; i++) {
    cannonballs.children[i].visible = false;
}
for (let i = 0; i < state.get('cannonballs').size; i++) {
    const cannonball = cannonballs.children[i];
    if (!cannonball) {
        cannonballs.add(cannonballFactory());
    } else {
        const position = polarToCartesian(
            state.getIn(['cannonballs', i, 'angle'], 0),
            state.getIn(['cannonballs', i, 'radius'], 0),
        );
        cannonball.position.x = position.x;
        cannonball.position.y = position.y;
        cannonball.visible = true;
    }
}
The last object in need of an update is the player’s ship, which is constantly sailing further along the circle surrounding the island. To update the ship’s position we have to convert the player’s polar coordinates to cartesian coordinates and account for the direction the ship’s heading.
ship.rotation.z = state.getIn(['player', 'angle']) - (state.getIn(['player', 'direction']) > 0 ? 0 : Math.PI);
const position = polarToCartesian(state.getIn(['player', 'angle']), state.getIn(['player', 'radius']));
ship.position.x = position.x;
ship.position.y = position.y;
Helpers
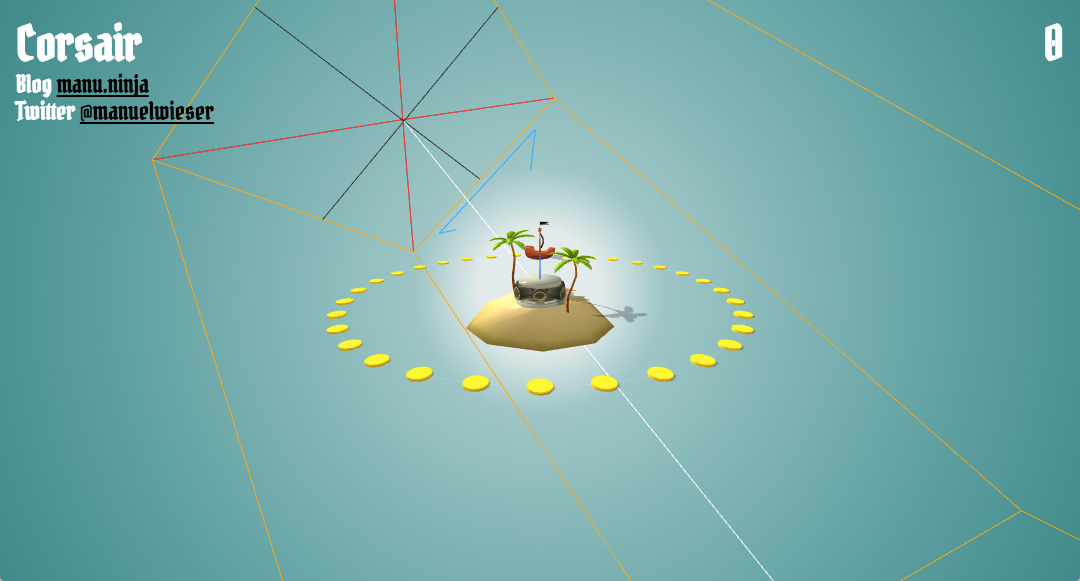
When building and debugging your WebGL/three.js scene during development you may want to use a few optional helpers. Some of them are provided by three.js, others can be quickly made by yourself.
To accurately test collisions between objects I’ve created a wireframe sphere factory. It returns a wireframe sphere in the size of the object’s collision sphere. There is still a comment in the ship factory, if you want to try it. The coins and cannonballs are very similar to their collision shapes, so they don’t need it.
function wireframeSphereFactory(size) {
    const geometry = new THREE.SphereBufferGeometry(size, size, size);
    const wireframe = new THREE.WireframeGeometry(geometry);
    const line = new THREE.LineSegments(wireframe);
    line.material.depthTest = false;
    line.material.opacity = 0.25;
    line.material.transparent = true;
    return line;
}
If you are uncertain as to where X, Y and Z are in your scene, you’ll want to render an axis helper.
const axisHelper = new THREE.AxisHelper(10);
scene.add(axisHelper);
To debug Corsair I’ve frequently moved the camera to a lower position. This position is difficult to play in, but it helps to see where the objects are spatially located.
camera.position.set(0, -100, 30);
camera.up = new THREE.Vector3(0, 1, 0);
camera.lookAt(new THREE.Vector3(0, 0, 0));
If you are uncertain about the camera’s arguments you can use a camera helper. The helper shows the frustum, line of sight and up vector of the camera. You can also pass the directional light’s shadow frustum to the camera helper, to see how the shadow is actually being calculated.
const cameraHelper = new THREE.CameraHelper(camera);
scene.add(cameraHelper);
Using the render function
The update function returned by the setup function is called each time our game loop emits a value. Using the animationFrame RxJS scheduler the stream updates at roughly 60 frames per second. The emitted value, an Immutable.js collection, is used to update the 3D objects in the WebGL/three.js scene.
const render = setup();
game(stage, score).subscribe({
    next: (state) => {
        render(state);
        // Test the game's end conditions...
    },
    error: error => console.error(error),
    complete: () => start(progress.stage, progress.score),
});
This concludes the Functional Reactive Game Programming – RxJS 5, Immutable.js and three.js series for 2017. If you’ve liked this article, be sure to read the first and second part of the series and return for a potential future update. I’d love to add explosions using sprites and particles to the game, as well as recreating The Wind Waker’s cartoon water shader.
I’d greatly appreciate your feedback. If you have any questions, please leave them in the comments section. If you spot an error, please create an issue in the Corsair GitHub repository. Also, if you want to help improve the game, feel free to fork it and open up a pull request.
And of course, I’d be glad if the series helped you create a game of your own, so please tell me about your projects!