Coding Image Processing Lazy Loading Performance
Thoughts on Linear Gradients That Resemble Images
· 6 Minutes / 1,533 Words
When Harry Roberts posted Improving Perceived Performance with Multiple Background Images he called for automation of his process. As you can see in my own Dominant Colors for Lazy-Loading Images the topic is dear to me, so I went and over-engineered Harry’s concept for fun in the past month.
Creating pixels using radial gradients
My first thought was re-creating pixels with radial gradients. I wrote a script for automating the process, which calculates the radial gradients you can see on the left from the source material on the right.
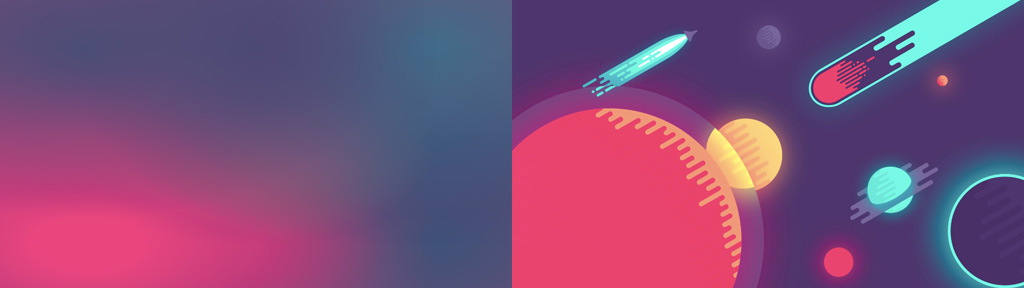
Rendering multiple radial gradients is computationally expensive and without proper blending modes the quality of the result will always depend on the order of your gradients. Therefore it should probably not be used on a real project.
Will Wallace then beat me to sharing the concept with the world. Will created a Blurground Sass function and manually picked the colors with Photoshop’s eyedropper tool. If you don’t want to use the eyedropper you may use my script and play around with the idea.
const gm = require('gm');
const fs = require('fs');
const handlebars = require('handlebars');

const args = process.argv.slice(2);
const input = args[0];

function rgb(hex) {
    var parts = /^#?([a-f\d]{2})([a-f\d]{2})([a-f\d]{2})$/i.exec(hex);
    return [
        parseInt(parts[1], 16),
        parseInt(parts[2], 16),
        parseInt(parts[3], 16)
    ].join(', ');
}

const source = gm(input);

const dominant = new Promise((resolve, reject) => {
    source
        .colors(1)
        .toBuffer('RGB', (error, buffer) => {
            if (error) {
                reject(error);
            }
            resolve('#' + buffer.slice(0, 3).toString('hex'));
        });
});

const colors = new Promise((resolve, reject) => {
    source
        .resize(3, 3, '!')
        .toBuffer('RGB', (error, buffer) => {
            if (error) {
                reject(error);
            }
            const string = buffer.toString('hex');
            const colors = [];
            for (let i = 0; i < 9;) {
                colors.push(rgb(string.slice(i * 6, ++i * 6)));
            }
            resolve(colors);
        });
});

Promise.all([dominant, colors])
    .then((values) => {
        fs.readFile('./gradients.hbs', 'utf-8', (error, content) => {
            let template = handlebars.compile(content);
            fs.writeFile('./gradients.html', template({
                image: input,
                dominant: values[0],
                colors: values[1]
            }));
        });
});<!doctype html>
<html>
<head>
<style>
body {
width: 100vh;
height: 100vh;
background-size: 100% 100%;
background-color: {{dominant}};
background-image:
url({{image}}),
radial-gradient(ellipse at 16.7% 16.7%, rgba({{colors.[0]}}, 1), rgba({{colors.[0]}}, 0) 50%),
radial-gradient(ellipse at 50% 16.7%, rgba({{colors.[1]}}, 1), rgba({{colors.[1]}}, 0) 50%),
radial-gradient(ellipse at 83.3% 16.7%, rgba({{colors.[2]}}, 1), rgba({{colors.[2]}}, 0) 50%),
radial-gradient(ellipse at 16.7% 50%, rgba({{colors.[3]}}, 1), rgba({{colors.[3]}}, 0) 50%),
radial-gradient(ellipse at 50% 50%, rgba({{colors.[4]}}, 1), rgba({{colors.[4]}}, 0) 50%),
radial-gradient(ellipse at 83.3% 50%, rgba({{colors.[5]}}, 1), rgba({{colors.[5]}}, 0) 50%),
radial-gradient(ellipse at 16.7% 83.3%, rgba({{colors.[6]}}, 1), rgba({{colors.[6]}}, 0) 50%),
radial-gradient(ellipse at 50% 83.3%, rgba({{colors.[7]}}, 1), rgba({{colors.[7]}}, 0) 50%),
radial-gradient(ellipse at 83.3% 83.3%, rgba({{colors.[8]}}, 1), rgba({{colors.[8]}}, 0) 50%);
}
</style>
</head>
<body>
</body>
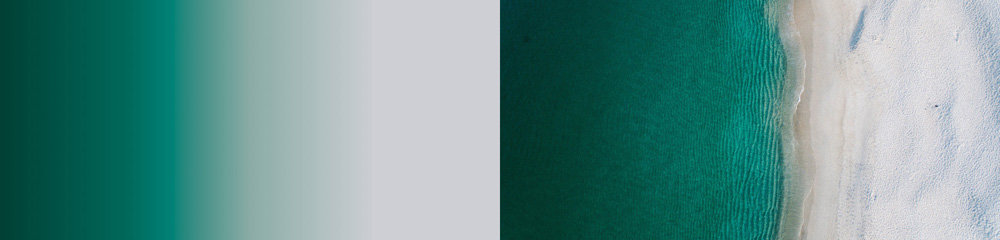
</html>Creating linear gradients with equal-width stops
My second thought was automating the color retrieval process for Harry’s concept. Though I wanted to detect the optimal color stop positions instead of just slicing the image in four quarters.
Meanwhile Ben Briggs created a PostCSS plugin that “provides a gradient fallback for an image that loosely resembles the original.” I decided to amend his plugin instead of publishing another npm package, containing just the algorithm.
Ben had used Paper.js to pick colors, which depends on a few non-JavaScript packages. This complicates setup of the plugin and lengthens builds times. Together we’ve replaced asset-resolver, image-size and paper with a single dependency to Jimp, making the plugin a Node.js-only solution. I recommend using the plugin, but if you don’t use PostCSS you can also use the script below in your builds.
const Jimp = require('jimp');

const args = process.argv.slice(2);
const input = args[0];
const stops = args[1] || 4;

function hex({ r, g, b }) {
    function convert(c) {
        const hex = c.toString(16);
        return hex.length === 1 ? '0' + hex : hex;
    }

    return '#' + convert(r) + convert(g) + convert(b);
}

function round(number, precision) {
    return Math.round(number * Math.pow(10, precision) ) / Math.pow(10, precision);
}

function gradient(stops) {
    return 'linear-gradient(90deg, ' + stops.map((stop) => {
        return `${stop.color} ${stop.position}%`;
    }).join(', ') + ')';
}

Jimp.read(input, (err, image) => {
    if (err) {
        throw err;
    }

    const width = image.bitmap.width;
    const height = image.bitmap.height;
    const chunk = width / stops;

    const result = [];

    for (let i = 0; i < width; i += chunk) {
        let color = image.clone()
            .crop(i, 0, chunk, height)
            .resize(1, 1, Jimp.RESIZE_BICUBIC)
            .getPixelColor(0, 0);

        result.push({
            color: hex(Jimp.intToRGBA(color)),
            position: round(i * 100 / width, 2)
        });
    }

    console.log(gradient(result));
    // linear-gradient(90deg, #023d33 0%, #036357 25%, #91aaa5 50%, #cdcfd5 75%)
});
Creating center-weighted linear gradients with variable-width stops
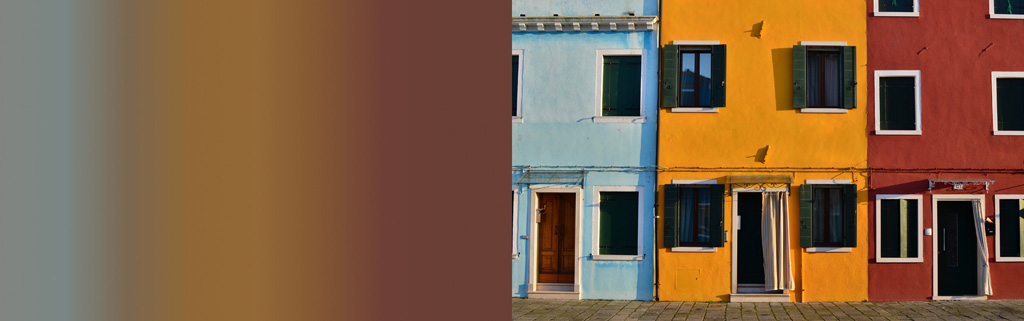
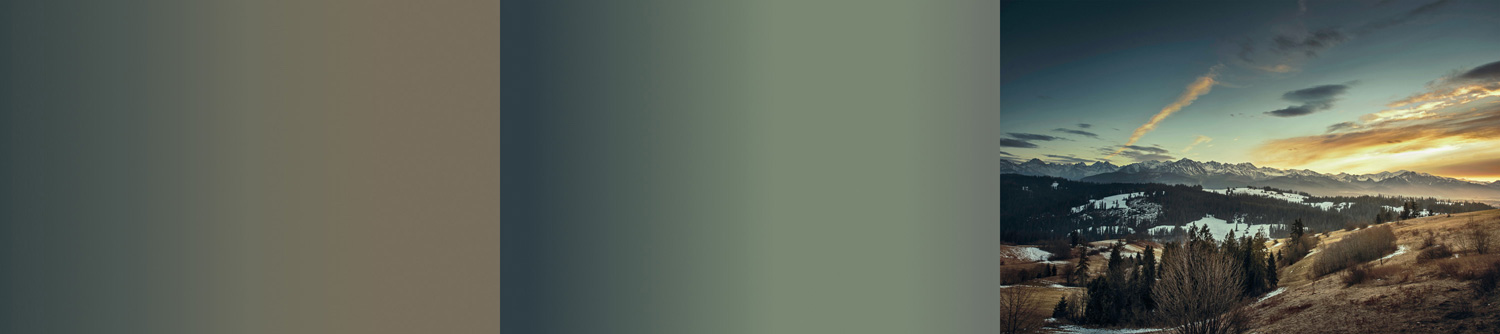
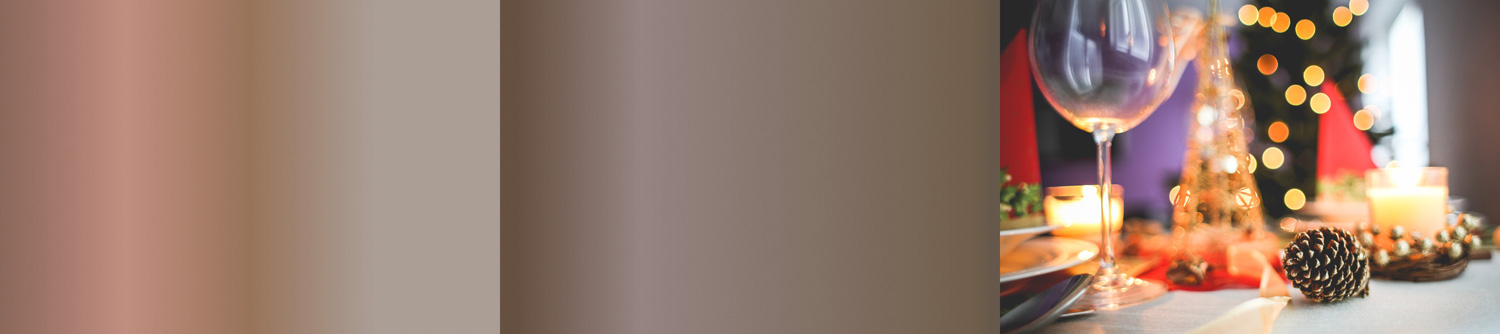
I still wanted to pursue my „intelligent algorithm“ idea. The approach was to smoothen and quantize the image, so you can find the largest color areas. The simplified image then has to be flattened to a single strip, which already resembles the final gradient. The last step is to take n of the largest color areas in the strip and use their color and position for the gradient stops.


You can see the result in the middle, compared to the previous algorithm on the left. I’ve also discovered that resizing the image to a height of four pixels prior to quantization helps putting more weight on the center of images. This effect is evident on the hot air balloon in the Kapadokya photograph.
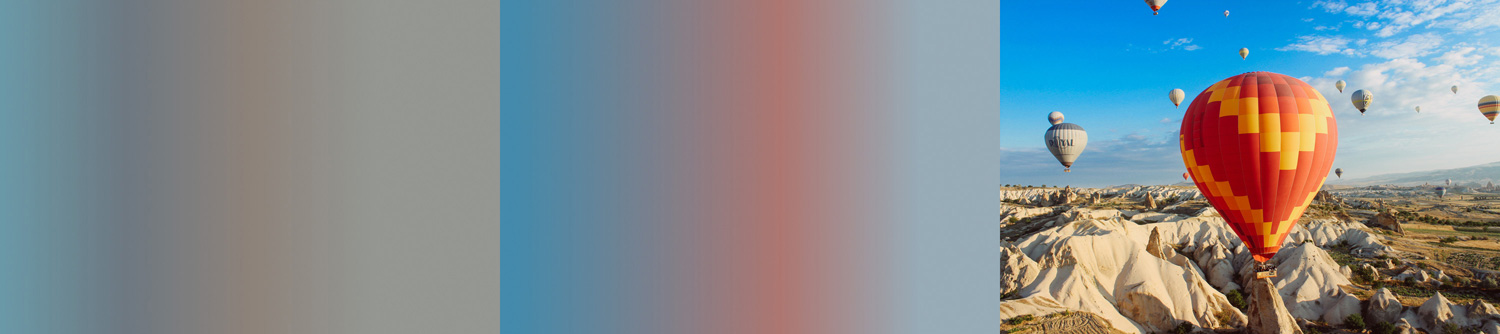
There are a few more comparisons below, showing that the result is not always distinctly better, but similar to the simpler approach.

Implementing the algorithm was easy, but there is no quantization in Jimp, so I had to search for an implementation of the NeuQuant algorithm. In the script below neuquant-js by Daniel Perez Alvarez is used, being a fork of a fork of Johan Nordberg’s gif.js.
I thought about opening a pull request for Jimp, but upon discovering that the most popular pure JavaScript GIF library is not an npm module I’ve just implemented what I need for the algorithm.
const Jimp = require('jimp');
const quant = require('neuquant-js').palette;

const args = process.argv.slice(2);
const input = args[0];

function findClosest(palette, r, g, b) {
    let minPos = 0;
    let minD = Number.MAX_SAFE_INTEGER;

    for (let i = 0, l = palette.length; i < l;) {
        const dR = r - palette[i++];
        const dG = g - palette[i++];
        const dB = b - palette[i];
        const d = dR * dR + dG * dG + dB * dB;

        if (d < minD) {
            minD = d;
            minPos = i / 3 | 0;
        }

        i++;
    }

    return minPos;
}

function hex({ r, g, b }) {
    function convert(c) {
        const hex = c.toString(16);
        return hex.length === 1 ? '0' + hex : hex;
    }

    return '#' + convert(r) + convert(g) + convert(b);
}

function round(number, precision) {
    return Math.round(number * Math.pow(10, precision) ) / Math.pow(10, precision);
}

function gradient(stops) {
    return 'linear-gradient(90deg, ' + stops.map((stop) => {
        return `${stop.color} ${round(stop.center, 2)}%`;
    }).join(', ') + ')';
}

Jimp.read(input, (err, image) => {
    if (err) {
        throw err;
    }

    const strip = image.clone().resize(256, 4, Jimp.RESIZE_BICUBIC);

    const palette = quant(strip.bitmap.data, {
        netsize: 16,
        samplefac: 10
    });

    strip.scan(0, 0, strip.bitmap.width, strip.bitmap.height, function (x, y, idx) {
        const colorIndex = findClosest(
            palette,
            this.bitmap.data[idx],
            this.bitmap.data[idx + 1],
            this.bitmap.data[idx + 2]
        );
        this.bitmap.data[idx] = palette[colorIndex * 3];
        this.bitmap.data[idx + 1] = palette[colorIndex * 3 + 1];
        this.bitmap.data[idx + 2] = palette[colorIndex * 3 + 2];
    });

    strip.resize(256, 1, Jimp.RESIZE_BICUBIC);

    const groups = [];
    let previous = '#';

    for (let x = 0; x < strip.bitmap.width; x++) {
        const color = hex(Jimp.intToRGBA(strip.getPixelColor(x, 0)));
        if (color !== previous) {
            groups.push({
                color: color,
                pixels: [x],
                weight: 1,
                center: x / strip.bitmap.width
            });
        } else {
            const group = groups[groups.length - 1];
            group.pixels.push(x);
            group.weight += 1;
            group.center = 100 * (group.pixels.reduce((a, b) => a + b) / group.weight) / strip.bitmap.width;
        }
        previous = color;
    }

    const weighted = groups.sort((a, b) => a.weight - b.weight);

    const sorted = weighted.slice(-4).sort((a, b) => a.center - b.center);

    console.log(gradient(sorted));
    // linear-gradient(90deg, #043630 9.77%, #02554b 33.79%, #c4c6dd 67.97%, #c4c6dd 95.31%)
});
Conclusion
You have seen three approaches, two of which are feasible for production. The examples show that the third algorithm is not always superior – it is center-weighted though and can return better results, depending on the image itself. You can run any of the three scripts and keep the gradients that work best for you.
resemble-image
I’ve published the resemble-image Node.js package in January 2017. It contains the algorithms getEqualWidthStops and getVariableWidthStops as described in this article, each of which provides you with color stops for a gradient that loosely resembles the original image.
I may also start incorporating Devon Govett’s gif-stream and neuquant into Jimp. If that’s something people want and Oliver Moran endorses, I’d be happy to do it.
If you liked this article, please consider sharing it with your followers.